Category Archives: Flash

Art Brush Features

To those of you who use my art brush tool, what features or tweaks would you like it to have? Here’s what I’ve got working so far in my development version:

  1. If a brush was applied in the wrong direction, just run the tool again and it’ll apply it the other way around
  2. It can now be used in multi-frame editing mode, allowing many strokes to be applied at the same time
  3. Brushes can be reapplied to a stroke that already has a brush applied to it. Simply select the art brushed stroke symbol on the stage and your new brush symbol in the library and run the tool. Your new brush will be applied in the same direction as the old one.
  4. Brushes always get applied from upper left to lower right, depending on the relative positions of the stroke’s endpoints.
  5. Undo.

Some things I’m planning on including but haven’t implemented yet:

  1. Select a symbol in the library that you’ve used as an art brush. You’ll be able to run a command that automatically updates all the strokes that have had that that brush applied to them. This means that you could change a brush that you’ve already used a bunch, and  the tool will go through and make sure everywhere that the brush is used, the stroke looks like the most current version.
  2. Modify the art brush tool to be able to apply animation, not just a still image, to a series of strokes. (See my previous post about this).

Some things I might do if there’s enough interest in it

  1. A control panel that changes how the brush is applied – direction of application, whether to scale the width relative to the length, etc.
  2. A shape-hint-style marker to indicate where to start the stroke
  3. Smarter decisions about which branch to follow when the path crosses itself.

So let me know what you think. What would you like to see it do? What current behavior annoys you and you’d like to see it fixed?

Animated Art Brushes

Ooooooh, holy crap! I just had a crazy awesome idea. I’ve been working on my art brush tool, implementing the ideas I laid out in my previous post. It got me thinking about some of the possibilities with the sort of changes I’m making. I could create more tools that expand the possibilities.

Here’s my crazy idea: animated art brushes.

Ahem. Let me put that another way.

ANIMATED ART BRUSHES!

Here’s how it would work. An animated brush symbol would be just like a normal brush symbol – all the art would have to be raw shapes on the first layer. The difference is that you could have more than one frame of art on that first layer. The frames could be applied in sequence to subsequent strokes. You’d apply it by selecting a range of frames and running the tool. It would apply the frames of the animated brush to the strokes in those selected frames.

What would you do with such a tool? I leave that up to you, but the possibilities stretch out before us like a gleaming possibility-filled thingamajig.

We Have the Technology.

I have some crazy ideas knocking around my head. My art brush tool is incredibly useful but it’s far from the most user friendly. There are a few usability features that I’ve wished for it for a long time:

  1. Be able to change brush art and have it be reflected in all the existing applications of that brush
  2. Be able to apply a brush in either direction, so that I don’t have to have duplicate brush symbols that are flipped around versions of each other.
  3. Avoid the problem of exiting a brush symbol before deselecting the art, which leads to the transform that’s been applied to it not taking hold for the purposes of the art brush tool.
  4. Be able to apply an art brush to multiple lines across multiple frames.
  5. Be able to apply a new brush to an existing stroke without having to deal with invisible lines or deleting the previously applied stroke
  6. Somehow be able to indicate a starting point for applying the art brush.
  7. Fix CS3 compatibility of the recolor version of the art brush. Unfortunately the non-recoloring one will likely never be possible in CS3 or earlier.

Here are some of my thoughts on solutions to these problems:

  1. This would actually be pretty easy if I made it so that every new application of a brush stroke was inside a new symbol. It would change to use the art brush tool a little, but it would add much more potential functionality than it takes away. If I did this I would probably keep the original stroke on a guided layer inside the new brush stroke symbol. I could store some data in the symbol, which would identify how this brush stroke was created – what direction, which brush, whether it was recolored, etc. Then it would be a snap to go through the library and find all the brush stroke symbols and operate on them in turn – updating the brush art, apply a different brush, etc.
  2. This would mean a new tool to apply the brush in the opposite direction than how it usually goes, but it would be a pretty simple change to the code.
  3. I’m pretty sure this is a bug in the Flash code, but I might be able to work around it. If I could check the brush symbol before applying it, making sure that there’s nothing selected in it, it would I’d never have to deal with this unapplied transform problem again. Amy I in a fantasy world to think that it could be so simple?
  4. This one might be solved with the symbol method I mentioned in #1. The problem so far has been that when I‘m in multi-frame editing mode and I have lines selected on multiple frames, if I run the brush tool it ends up putting all the art brush strokes on a single frame. This is one are that’s definitely worth investigating, because this is a problem that comes up frequently when, for instance, animating an animal’s tail or some waving seaweed or what have you. To have to go through and apply the art brush tool separately on each frame is a big pain in the butt.
  5. This one is solved by the solution to #1 as well. With the info in the symbolize brush stroke it would be easy to delete the existing brush art and apply the new brush to the original line in the same way it was originally applied. It would just mean that the art brush tool would do its normal thing if a raw shape is selected but if a symbol instance is selected it would try to replace the existing brush art with the new. If the selected symbol instance doesn’t conform to the standard brush stroke symbol format, the tool would do nothing. Badabing!
  6. If I used something like the shape hint system that I use for the autotweener when operating on raw shapes, it would mean that the starting point could be much more easily managed in a long sequence of animated brush strokes. The tool would just start from whichever end point is closest to the shape hint.
  7. I had it working before so it shouldn’t be hard to get it back into shape.

Conclusion: it seems like a no-brainer, then, to change the functionality of the art brush tool to be more like I outlined in #1. #2 and #3 shouldn’t be difficult to implement, assuming everything goes as I expect (which may not be a reasonable assumption based on my past experience with JSFL). #6 will be a little more work and I may put that off a bit. At least I could reuse some code from the autotweener, though. And #7, as I said, should be pretty easy.

These changes are pretty high on my to-do list for my library of Flash commands. If you leave a message encouraging me I’ll be more likely to make it happen.

A Few Random Things

What’s Next?

After finishing up my most recent freelance project (watch for an announcement about the launch) I’m once again on the job hunt. I’d really like to get back to full time positions with benefits and tax withholding and all that good stuff. While I seem to have been doing okay as a freelancer for the last year and a half or so, it’s inherently a more stressful way to lead my life. It’s time for a little stability.

Da Blog

I’ve been thinking for a long time that I wanted to post more stuff in this blog. A lot of stuff goes on in my head and I’d definitely like to share it with people. Plus, my impression is that the more a person updates a web site, the higher it’ll rise in the Google results. You can’t argue with that kind of exposure for someone who produces work like I do – animation and small software tools.

Flash Tools

I’ve made a few new Flash tools recently and I hope to post a few of those in the near(ish) future. In particular I’ve been using one I created to delete empty layers (really simple function, but it’s wonderful for cleaning up a timeline), and another to select the current symbol instance’s library item (works fantastically with multiswap).

I’m on the Flash CS7 beta!

I finally got on Adobe’s Flash closed beta program. Actually, I got into it a couple months ago but I didn’t have the time to download and check it out until a couple days ago. It looks good so far, though as always I wish they would address more of the features on my wish list. But they seem to have done a lot of optimization on the Javascript (JSFL) execution. My art brush plugin is blazingly fast! Anyway, hopefully I’ll have some more time to really check out the program. Maybe a small project to put it through its paces?

Flash JSFL Commands: Symbol Sync Tools

You may recall that I generally avoid ever having “Sync” turned on in any of my classic tweens (see my post about motion tweens and sync for more details). Sometimes, though Sync was still necessary to keep symbols synchronized with themselves along a timeline with lots of keyframes. It just ended up causing too many problems, though, because I would forget it was turned on and then something would get screwed up somewhere and it would take me a while to figure out what the problem was.

My solution was to create some tools that make the syncing process explicit, rather than “turn it on and it’ll remain on indefinitely”. With these tools you can, at any time, tell Flash to synchronize a given symbol instance from this frame forward. It doesn’t do any of the problematic Sync functions, though, like swapping out symbols. All it does is deal with the looping options.

One of the huge advantages of my system is that you can work with multiple symbols on the same layer. It’ll only operate on instances of the same symbol. This, of course, goes hand-in-hand with my autotween animation method.

Over the years I’ve created several sync commands:

  1. Sync symbols

    Does what I described above: synchronizes looping properties (single frame / play once / loop, first frame) forward from this frame. Note that there isn’t a corresponding command to sync in reverse, since the results wouldn’t be well-defined. What should it do, for instance, if syncing a “play once” symbol backward would take it into the negatives?

  2. Sync Instance Names Forward, Sync Instance Names Backwards

    Makes sure all the instances of this Movie Clip symbol on this layer (either from here forward or from here back, depending on which command you run) have the same instance name.

  3. Sync Pivots Forward, Sync Pivots Backward

    I use these ones all the time. They synchronizes the position of the pivot point. Let’s say, for instance, you created an arm symbol. You put it on the stage, create a few keyframed poses, and then you realize you actually wanted to have the pivot point at the shoulder. All you need to do is set the pivot on the first keyframe, then run “Sync Pivots Forward.” Boom, they all have the same pivot. This is especially useful when dealing with classic tweens, where the symbol will jump at a keyframe if the pivot point changes.

The Obligatory Caveats

These commands all work with contiguous symbol instances. That is, if one of the commands is going forward syncing up symbol instances, if it encounters a frame where there isn’t an instance of that symbol then it will stop. If the symbol appears again on a later frame then you’ll have to run the command again there.

Video Demo

Download and Install

You can get the commands from the link below. Simply download and open to install.

download_iconSync Tools

If you have any questions please let me know in the comments below or send me email.

These tools are released under the Creative Commons Attribution-Noncommercial-Sharealike 3.0 license.

Start Frame Madness

Setting a graphic symbol’s looping “first frame” value is kind of a pain in the butt. Well, actually it’s not hard at all. Here are the steps:

  1. On the stage, select the symbol instance you want to work with (if it’s not already selected)
  2. Make sure the “looping” section in the properties panel is expanded
  3. Select the “First” box in the properties panel
  4. Type in the frame number you want
  5. Hit <enter>

Not too hard, right? Well, sort of. All those steps can add up if you’re working a lot with graphic symbols, especially when you’re switching between different start frames a lot, such as when doing lip sync or when all your hand poses are inside a single symbol. It’s even worse when you don’t know which exact frame you’re looking for. Then you have to either guess the frame number or go inside the symbol to see where the pose you want is located. Bleh.

So I made some commands. I set up a system where the steps for changing the first frame of a graphic symbol are:

  1. On the stage, select the symbol instance you want to work with (if it’s not already selected)
  2. Type in the frame number you want

… and, done. You don’t even have to hit <enter>.

Even better, I made it so that if you hold down the <ctrl> key while you type in the frame number, it simultaneously switches the symbol instance to single-frame (a feature I found useful quite often).

Even more better, I made it so I can hit the plus and minus keys to increment or decrement the start frame. It’s super convenient for when you’re hunting for what frame your desired pose is on.

Even superlative better, I created another command that sets all the selected graphic symbols to start on a random frame. That’s useful when you’re reusing the same animation loop in different places on the stage but you want them to look more random by having them be at different places in their loop. For instance, I’ve done this with falling rain and blowing leaves.

That’s Crazy Talk!

But how, you may ask, does it know when you’re done typing frame number, and what if you screw up and need to type a different number? Elementary! My commands have a built-in timeout. They keep looking for additional digits to tack onto the current frame number as long as it’s been less than one second since the last number was pressed. If you let it wait for a second, you can start typing in a new number.

For instance, let’s say I select a symbol instance and I type in “43”, but then I realize that I made a type and I actually wanted “34”. All I need to do is wait a little more than a second to run down the timer, then I can type in “34” and everyone’s happy in the end!

Keyboard Shortcut Jiggery-Pokery

The trick with these commands, though, is that they take an end run around the normal way to define keyboard shortcuts. Normally in Flash, if you want to use a number key as part of a shortcut, you have to include the <ctrl> key. The thing I noticed, though, is that the actual keyboard shortcut file doesn’t have that same limitation. The limitation is entirely imposed in the keyboard shortcuts dialog.

A little bit of hacking later and I figured out the shortcut file format. With a little ingenuity I was able to rig it all up as I described above. If you want to have this setup too then you’ll need to manually edit your keyboard shortcut file as well.

One Small Caveat

The only weirdness I’ve ever run into in years of using this system is that it seems to screw up the use of the number keys in the preferences dialog (accessed through the Edit menu). There are a few possible ways of dealing with this:

  • Set your preferences while the default shortcuts are activated, then switch back to your custom shortcuts.
  • If you need to enter a number in the Preferences dialog, just type it in another program and then copy and paste.
  • Assign shortcuts only to one set of number keys – either the ones above the letter keys on the keyboard, or the numeric keypad.

For years I’ve used these shortcuts without noticing the Preferences dialog problem – I suppose because it’s rare that I need to change numerical preferences for Flash. I think I’ve realized, though, that I only ever use these shortcuts on the numeric keypad, so my preferred solution is to only assign to those keys.

And Now the Actual Instructions

The first thing to do is to download and install the Set Frame commands:

download_iconSet Frame Tools

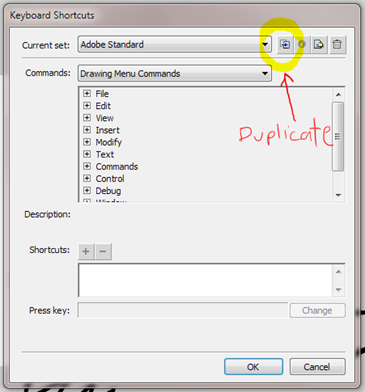
The next thing you need to do is have a custom shortcuts file. If you’ve never set a custom shortcut then you probably don’t have one yet. To get a custom shortcuts file, go to the Edit menu and select ""Keyboard Shortcuts”. In the dialog that comes up, hit the “Duplicate Set” button, just to the right of the topmost dropdown box that’s labeled “Current set”:
image

Select a name for your custom shortcuts. Mine are simply called “David’s Flash CS4”. Hit OK and then exit Flash.

Next you’ll need to open your shortcuts file in a text editor. In Windows, Notepad will do fine. I’m not a Mac person so I’m no sure what you’d use on a Mac. According to Adobe, your shortcut file is located in one of these locations (change the highlighted portions based on your username, version of Flash, and language):

  • Windows® 7™:
    boot driveUsersusernameAppDataLocalAdobeFlash CS6languageConfigurationKeyboard Shortcuts

  • Windows® Vista™:
    boot driveUsersusernameLocal SettingsApplication DataAdobeFlash CS6languageConfigurationKeyboard Shortcuts

  • Windows XP:
    boot driveDocuments and SettingsusernameLocal SettingsApplication DataAdobeFlash CS6languageConfigurationKeyboard Shortcuts

  • Mac OS® X:
    Macintosh HD/Users/username/Library/Application Support/Adobe/Flash CS6/language/Configuration/Keyboard Shortcuts/

Once you’ve found your keyboard shortcuts folder you should find a file in it with the same name as your personalized shortcuts that you saved earlier. Open that file in a text editor. For instance, in my case (using CS4 in Windows 7) I’d open this file in a text editor:

C:UsersdavidAppDataLocalAdobeFlash CS4enConfigurationKeyboard ShortcutsDavid's Flash CS4.wfx

In that file you’ll find something like this:

	<KeyboardShortcuts version="1.0"> 
	  <Shortcut id="32782" key="70" scope="21" flags="11" />  
	   ...
	  <Shortcut id="33454" key="119" scope="2" flags="9" />
	</KeyboardShortcuts>

Just before the last line (“</KeyboardShortcuts>”) you’ll need to insert some new code. To use the number keys at the top of the keyboard, insert the following:

	<Shortcut name="set fr up" key="187" scope="1" flags="1" /> 
	<Shortcut name="set fr down" key="189" scope="1" flags="1" /> 
	<Shortcut name="set fr 0" key="48" scope="1" flags="1" /> 
	<Shortcut name="set fr 1" key="49" scope="1" flags="1" /> 
	<Shortcut name="set fr 2" key="50" scope="1" flags="1" /> 
	<Shortcut name="set fr 3" key="51" scope="1" flags="1" /> 
	<Shortcut name="set fr 4" key="52" scope="1" flags="1" /> 
	<Shortcut name="set fr 5" key="53" scope="1" flags="1" /> 
	<Shortcut name="set fr 6" key="54" scope="1" flags="1" /> 
	<Shortcut name="set fr 7" key="55" scope="1" flags="1" /> 
	<Shortcut name="set fr 8" key="56" scope="1" flags="1" /> 
	<Shortcut name="set fr 9" key="57" scope="1" flags="1" /> 
	<Shortcut name="static set fr 0" key="48" scope="1" flags="9" /> 
	<Shortcut name="static set fr 1" key="49" scope="1" flags="9" /> 
	<Shortcut name="static set fr 2" key="50" scope="1" flags="9" /> 
	<Shortcut name="static set fr 3" key="51" scope="1" flags="9" /> 
	<Shortcut name="static set fr 4" key="52" scope="1" flags="9" /> 
	<Shortcut name="static set fr 5" key="53" scope="1" flags="9" /> 
	<Shortcut name="static set fr 6" key="54" scope="1" flags="9" /> 
	<Shortcut name="static set fr 7" key="55" scope="1" flags="9" /> 
	<Shortcut name="static set fr 8" key="56" scope="1" flags="9" /> 
	<Shortcut name="static set fr 9" key="57" scope="1" flags="9" /> 

To use the numeric keypad, insert the following:

	<Shortcut name="set fr up" key="107" scope="1" flags="1" /> 
	<Shortcut name="set fr down" key="109" scope="1" flags="1" /> 
	<Shortcut name="set fr 0" key="96" scope="1" flags="1" /> 
	<Shortcut name="set fr 1" key="97" scope="1" flags="1" /> 
	<Shortcut name="set fr 2" key="98" scope="1" flags="1" /> 
	<Shortcut name="set fr 3" key="99" scope="1" flags="1" /> 
	<Shortcut name="set fr 4" key="100" scope="1" flags="1" /> 
	<Shortcut name="set fr 5" key="101" scope="1" flags="1" /> 
	<Shortcut name="set fr 6" key="102" scope="1" flags="1" /> 
	<Shortcut name="set fr 7" key="103" scope="1" flags="1" /> 
	<Shortcut name="set fr 8" key="104" scope="1" flags="1" /> 
	<Shortcut name="set fr 9" key="105" scope="1" flags="1" /> 
	<Shortcut name="static set fr 0" key="96" scope="1" flags="9" /> 
	<Shortcut name="static set fr 1" key="97" scope="1" flags="9" /> 
	<Shortcut name="static set fr 2" key="98" scope="1" flags="9" /> 
	<Shortcut name="static set fr 3" key="99" scope="1" flags="9" /> 
	<Shortcut name="static set fr 4" key="100" scope="1" flags="9" /> 
	<Shortcut name="static set fr 5" key="101" scope="1" flags="9" /> 
	<Shortcut name="static set fr 6" key="102" scope="1" flags="9" /> 
	<Shortcut name="static set fr 7" key="103" scope="1" flags="9" /> 
	<Shortcut name="static set fr 8" key="104" scope="1" flags="9" /> 
	<Shortcut name="static set fr 9" key="105" scope="1" flags="9" />

If you’d like to use both sets of number keys, simply insert both blocks of shortcut code into your shortcuts file before the last line.

Finally, save your shortcuts file and restart Flash. Your new shortcuts should be ready to go.

Wrapping Up

In case you missed it the first time around, here’s the download link for the Set Frame tools:

download_iconSet Frame Tools

If you have any questions please let me know in the comments below or send me email.

These tools are released under the Creative Commons Attribution-Noncommercial-Sharealike 3.0 license.

Frame and Layer Distribution

Sometimes you need to do something but it just isn’t available in the program you’re using. It used to be that in this situation I’d just sigh and do it manually, wishing under my breath that the programmers had included a few more features. Then along came scripting languages.

At some point during my first Flash animation job I discovered the wonderfulness of JSFL commands. They let you do lots of cool stuff. It’s just a matter of deciding whether the time it takes to script the solution is, in the long run, a time saver or a waste of effort. I’ll admit that I’ve created a few Flash commands that were really overkill, and that I may never break even on time spent making the tool versus how long it takes to just do the thing manually.

My boss from that first job contacted me yesterday and asked if I could make a tool for him. He had one that had worked fine in his previous install but he recently upgraded to Flash CS4. He had been the longest holdout I know on Flash MX 2004, a version that came out in (you guessed it) 2004, and still has certain things going for it.

Anyway, it turned out I was able to help him get his old tool working in CS4, so I didn’t actually need to write a new one. By the time I discovered this, though, I had already finished writing about 3/4 of a new version of the tool, so I ended up just finishing it for myself. It fills in a gap in my toolset, anyway, so it’s a good thing to have.

I’m going to introduce that tool today, along with several others that are kind of in the same category. They are distribution tools. They all take symbols or frames or layers and distribute them to separate frames or separate layers. Flash actually has a built-in one of these: “distribute to layers”. That one simply takes all the selected elements and puts each one on a new, otherwise empty layer. It’s useful if you’ve created a bunch of symbols on one layer but need them on separate layers in order to animate.

There are several of these, so I’m just going to present them in list form.

  1. Distribute frames to layers

    Takes the selected frames and puts each one on its own new layer. This is the command I semi-unnecessarily created yesterday.

  2. Distribute to existing layers

    Like the built-in “distribute to layers” function, except this time it will try to distribute the symbols to layers that already exist, and keep them in the same frame range. It will only create new layers if there aren’t enough already for the distribution.

    This command is useful if you’ve done some animation on a single layer but then realize you need the symbols on separate layers. You can go through and apply this command to each frame and it’ll distribute all the symbols onto the same set of layers.

  3. Distribute to frames

    Takes all the selected symbols and puts each one in a keyframe by itself, all in the same layer. Sometimes it’s easier to create your animation keys all on the same frame, and this lets you splay them out across frames once you’re done.

  4. Distribute to layers on current frames

    Just like the built-in command, except that instead of creating a keyframe on frame 1 of the new layers, it creates a keyframe on the same frame as where the distributed elements are coming from. Thus the stage still looks the same in that range of frames, it’s just that now those symbols are each on their own layer. I find this one to be an improvement over the built-in “distribute to layers”, since I almost always want the distributed elements to maintain their original position in time.

Download

Since these tools are all related I’ve packaged them as a single download. Enjoy!

Distribution Commands

Flash Extensions: Frame Navigation

It can be frustrating moving around in Flash.  Whenever you move to a new keyframe you almost always lose the selection you had previously.  I’ve made some commands to help avoid this problem.

These are designed to be drop-in replacements for the built-in Flash operations normally bound to the “>” and “<” keys.  In normal operation, those keys move the current frame marker forward or backward one frame.  They’re useful when you want to slowly go through your animation, or when you don’t want to have to go to the mouse to move to the next or previous frame.

The difference with my versions, though, is that now your selection will remain selected in the new frame.  That is, whatever symbols you had selected in the previous frame will also be selected in the new frame.  It’s fantastic for when you want to go through an animation one frame at a time and adjust the same element(s) on each frame.

There are six commands in this package:

  1. Same object frame dec and Same object frame inc
    These commands move back or forward one frame, keeping the same selection.  If you had a symbol selected in the old frame and it exists in the new one, it’ll be selected there too. I have these bound to the hotkeys mentioned above – “<” and “>” respectively.
  2. Same object keyframe dec and Same object keyframe inc
    These operate exactly the same way, except that they move to the next keyframe on the currently active layer. This is great for moving between keyframes without having to laboriously traverse the intervening non-key frames. I have these bound to the same keys as above, but while holding down
  3. Same object go to first frame and Same object go to last frame
    These commands will move the current frame to be either at the beginning or the end of the timeline.

A couple notes about these tools:

  1. They work best in Flash CS4 or earlier.  In CS5 Adobe changed something about how Flash updates the display after running a JSFL command. Now you can’t see what the screen looks like as-you-go – you have to stop and wait for it to update.  This means you can’t, for instance, just hold down the “>” key and see the animation go by slowly.  The reduced functionality of these tools is actually one of the main reasons I haven’t upgraded to CS5.
  2. If a symbol doesn’t exist on the frame you move to, obviously it can’t be selected.
  3. If you have more than one instance of the same symbol on the same layer then the tool can only track one of them.  There are some details behind this that I don’t really have the energy to go into here, but on the new frame probably only one of your two symbol instances will be selected.  For this reason I often end up duplicating symbols so that I can have more than one of them on the same layer and still have the frame navigation tools work properly (as well as autotween, which runs into a similar problem).

Here’s a video demonstrating my navigation tools:

And here’s a download link for the installation file:

Frame Navigation Commands

Flash Panel Extension: Autosaver

Every time a new version of Flash is released I get excited and hopeful. On each new version, though, the excitement and hope is less and less. Adobe just never seems to address areas that I think need addressing.  Sometimes they even make things worse, such as in the transition from CS4 to CS5. CS5 and CS5.5 have this problem with a delay in updating the stage after executing a JSFL command.  It makes several of my commands much less useful, and I wasn’t ever able to figure out a workaround.  It impacts my workflow so much that I still don’t use Flash CS5 if I don’t have to.

One thing that they did do right, though, was adding auto-save to Flash CS5.5.  It boggled my mind why it was missing for so many years, particularly in a program that crashes as much as Flash does. Who can say what lurks in the minds of the Flash architects?  At least it arrived eventually and people can finally be secure that they aren’t going to lose their work if Flash crashes.

What, then, about the rest of us who haven’t upgraded?  Several years ago, long before CS5.5 existed, I got frustrated with the lack of autosave so I went out looking for a plugin that would do the job for me.  I found this auto-save WindowSWF panel, one that was a little too basic for me.  It had several fundamental problems that made it, in the end, not quite good enough. First, its layout is poor, making it take a lot of screen real-estate.  Second, it’s disabled by default, and it doesn’t remember its previous setting when Flash is started (meaning you have to remember to set it going every time you start Flash).  Third, it saves over the current file and you can’t roll back to a previous version unless you were careful to save off iterations manually.

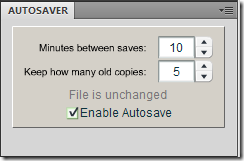
So I had finally had enough and I sat down to write a better one.  I ended up making one that works through the same basic system – a WindowSWF panel – but much more thought-out and featureful. Here’s what mine looks like:

image

There are three controls here.

  • Minutes between saves: controls how often the autosaver will save your file
  • Keep how many old copies: you can have it keep up to nine old versions of your file.  All the old files are stored in a subfolder of the folder your FLA is in, so your main directory doesn’t get cluttered with autosave files.
  • Enable: disables the autosaver if it’s unchecked.
  • Additionally, there’s a readout of how long it’ll be until the next auto-save, based on how long it’s been since the file was first modified.

One key thing to note is that this autosaver remembers its state, so it’ll come up exactly how you left it when you last had it open.  That means that it just works and you don’t have to think about it most of the time – a vital feature of a safety backup tool like this.

Since it’s a WindowSWF, though, you have to keep it open all the time.  If you collapse or dismiss the window it will stop running.  Unfortunately that just seems to be the way these things work, so it’s not totally foolproof.

David’s Autosaver installer

Flash JSFL Commands: Fun with Transforms

Usually, the tools that Flash provides natively are sufficient for dealing with transforms (the details of a symbol’s position, rotation, skew, and scale).  Sometimes, though, you need a little more.  I’m going to introduce two tools today that provide more flexibility in resetting symbols back to their default transform.

Reset Transform (improved)

When you hit ctrl-shift-Z in Flash it’ll reset the transform of all the selected symbols back to their default state.  That means 100% scale, with no rotation or skew.  But what if you want the default scale/rotation/skew to be something different?  Wouldn’t it be nice if you could define an arbitrary transform that you wanted ctrl-shift-Z to reset a symbol back to?

As you may have guessed, I’ve created just such a thing. It includes two Flash commands.

  1. The first creates a reference symbol that has your definitions of your symbols’ default state.  All you have to do is put all your symbols on the stage in the position you’d like them to be in by default and call Commands->Create symbol scale reference. That creates a symbol in your library called _symbol_scale_reference in which all your symbols you had selected now reside, defining their default transform.
  2. The is the command that does the resetting.  It simply takes the selected symbols and changes their transforms to match whatever is in _symbol_scale_reference.  If the reference symbol doesn’t exist then the command’s operation is identical to the standard Reset Transform command. I recommend switching your ctrl-shift-Z keyboard shortcut over to this command, since it’s functionally the same as the original Reset Transform but with the added functionality if you want it.

download_iconReset transform (improved) installer

Zero Transform

But that’s not all!  I have another even cooler extension for you today!

One of the functions that I sorely missed for years in Flash was Zero Transform.  That’s a function that takes the current state of a symbol instance and makes it the zero point in the transform.  That is, after zeroing a transform, your selected symbol won’t have changed in appearance but its transform will now be 100% scale with 0 rotation and skew. Any 3d animation program worth its salt has this functionality, so why doesn’t Flash?

It took some doing, but I managed to write a Zero Transform command for Flash.  I use it all the time, and I think you may find it useful too.

Included are two commands: Zero transform as is and Zero transform at scale. The first is exactly as I described above, and the one I find most useful.  The second does something very similar, except that instead of resetting the transform so that it ends up at 100% scale, it does it so that it ends up an arbitrary X and Y scales that you specify.

I use Zero transform as is enough that I have it bound to an easy-to-remember keyboard shortcut: ctrl-alt-Z. I think of it as a more authoritative version of ctrl-shift-Z.

download_iconZero Transform installer