My Ten-Year Plan

Ten years and one month ago I arrived in Los Angeles.  I had decided that what I really wanted to do with my life was animation, and by far the place to accomplish that goal was Los Angeles. I didn’t really have the chops to work in the industry, though, so initially it was all about working as a software engineer, establishing residency, and applying to UCLA – all of which I did as planned.

Initially, when making this big decision to leave the Northwest and find my fortune in the land of silicone and douchebaggery,I set a goal for myself. “In ten years,” I said, “I want to have my name in the opening credits of a feature film. It was a lofty goal, but it felt good to be aiming high.

So here it is, ten years later.  I haven’t worked on any feature film, let along been in the opening credits. I’ve worked on two different TV shows, though, which is nothing to sneeze at. I still love the idea of working in film, though, something that seems to be increasingly difficult for a 2D animator to do.  Almost all 2D animation these days is for TV and casual games. Those are certainly fine and good and pay the bills, but they lack the luster of film.

Well, tomorrow I take the next step. I’ll be starting a three-month freelance job doing animated cut scenes in a modest-budget theatrical feature scheduled to be released some time next year.  Feature film credits, here I come!

I don’t know yet whether it’s okay for me to say what I’ll be working on.  They didn’t have me sign an NDA for the interview, so it might not be super-hush-hush. If they tell me I can talk about it then I’ll update you, my multitudinous loyal readers, about all the gritty details. For now, suffice it to say that I’m excited about this new job. Working on a movie, plus a cool subject matter that I’m excited about, plus remuneration, all add up to David is Stoked.
Demo Reel and CTNX

I thought it would probably be a good idea to post a link to my demo reel on here,  So here it is.  If you’d like to see my latest demo reel, you can see it at:

http://reel.pinkandaint.com/

Happy viewing!

In other news, I attended a whole bunch of CTNX this weekend.  CTNX is an industry event – I suppose you could call it a convention – wherein lots of animation industry people and lots of animation students converge, buy and sell comic books and posters, attend panel discussions, and so on.  It’s really for industry people and those who want to break into the industry, so it shouldn’tr be confused with events like Anime Expo or other fan-oriented conventions.  There was no one there in costume.

It was interesting and fun.  I made connections with a few people who could be good contacts in the future.  One studio head said he really liked my reel and he’d consider hiring me if his studio were looking for animators right now.  So that felt pretty good.

I got the feeling that he was a little surprised to see a reel with professional-looking animation on it, as opposed to the many he must have viewed at CTNX from students.  Not that students can’t have good stuff, but it tends to be a lot more uneven.  And hey, I’m not judging at all! I was there; I know how it is.  It’s so hard to break in, and it’s so hard to get the experience and chops you need in order to break in without already having broken in.  There’s nothing like professional experience to improve your chops.

I also met a few new students and until-recently-students.  Nice people who I wouldn’t mind hanging out with. You know, there’s nothing like hanging out with someone you can talk shop to. In fact, I love going to parties where there will be some of my animation friends, since it means I can talk some shop. 

Speaking of parties, I have a final thought for the day. I believe I got this advice from Tom Sito, animator, teacher, union rabble-rouser: Every industry party you get invited to, GO! It’s all about the networking. I try to keep that in mind too, helping people I know get jobs whenever I can.  I love maintaining those relationships because A) I like doing nice things for people, and B) I figure there’s a good chance it’ll come back my way at some point.

3d Is Different

Since I’m out of work at the moment I thought I’d take some time and see if I can get into the swing of 3d animation in Maya.  I’ve dome some 3d before but only as part of a class at UCLA.  I suppose the class was informative and helpful but in no way did it get me where I need to go.  I ended up spending most of my time in the class making amateurish models with amateurish rigs, leaving very little time for actual animation, which is where my interest really lay.  I ended up kind of half-assing the final film, not having enough time to really get it done right.  The only motion I ended up finishing was supposed to be of a fat sheep reaching in vain for some grass, but it ended up looking more like it was barfing.

I come to it now knowing what I really want to do, though, and what I think I’ll enjoy and be kinda good at.  I’m a character animator.  What I want to do is animate characters – not model them, not rig them, not paint them.  Let the other people do those things – people who enjoy and are good at them.

Brief Aside

When I was working on Don’t Fear the Sitter I dreaded doing the backgrounds.  A lot of animators I know looked forward to that part, since it was so much less work for them.  And while, yes, overall the BGs took less time for me than the animation did, and I don’t think I did a bad job on them, they were a real chore.

End of Aside

So I downloaded the student version of Maya.  (The people at Autodesk totally have the right idea in making it free for students and the unemployed – training up their future customers.) I bought a Maya book.  I downloaded a character rig (thank god there are people out there who make these things and release them for free).  I dove in.

I figured the most basic thing to try out at first would be a good old walk cycle.  I tried to put in some Richard Williams style flourish, breaking elbows and escaping from that two-dimensional plane in which the traditional side-view walk cycle resides.  Here are the results:

Have You Seen My Sister Evelyn?

I recently did some work on a music video and it just went live a couple days ago.  I think it’s a really good video and I’m happy to have worked on it.  Here it is:

Flash Extensions: Frame Navigation

It can be frustrating moving around in Flash.  Whenever you move to a new keyframe you almost always lose the selection you had previously.  I’ve made some commands to help avoid this problem.

These are designed to be drop-in replacements for the built-in Flash operations normally bound to the “>” and “<” keys.  In normal operation, those keys move the current frame marker forward or backward one frame.  They’re useful when you want to slowly go through your animation, or when you don’t want to have to go to the mouse to move to the next or previous frame.

The difference with my versions, though, is that now your selection will remain selected in the new frame.  That is, whatever symbols you had selected in the previous frame will also be selected in the new frame.  It’s fantastic for when you want to go through an animation one frame at a time and adjust the same element(s) on each frame.

There are six commands in this package:

  1. Same object frame dec and Same object frame inc
    These commands move back or forward one frame, keeping the same selection.  If you had a symbol selected in the old frame and it exists in the new one, it’ll be selected there too. I have these bound to the hotkeys mentioned above – “<” and “>” respectively.
  2. Same object keyframe dec and Same object keyframe inc
    These operate exactly the same way, except that they move to the next keyframe on the currently active layer. This is great for moving between keyframes without having to laboriously traverse the intervening non-key frames. I have these bound to the same keys as above, but while holding down
  3. Same object go to first frame and Same object go to last frame
    These commands will move the current frame to be either at the beginning or the end of the timeline.

A couple notes about these tools:

  1. They work best in Flash CS4 or earlier.  In CS5 Adobe changed something about how Flash updates the display after running a JSFL command. Now you can’t see what the screen looks like as-you-go – you have to stop and wait for it to update.  This means you can’t, for instance, just hold down the “>” key and see the animation go by slowly.  The reduced functionality of these tools is actually one of the main reasons I haven’t upgraded to CS5.
  2. If a symbol doesn’t exist on the frame you move to, obviously it can’t be selected.
  3. If you have more than one instance of the same symbol on the same layer then the tool can only track one of them.  There are some details behind this that I don’t really have the energy to go into here, but on the new frame probably only one of your two symbol instances will be selected.  For this reason I often end up duplicating symbols so that I can have more than one of them on the same layer and still have the frame navigation tools work properly (as well as autotween, which runs into a similar problem).

Here’s a video demonstrating my navigation tools:

And here’s a download link for the installation file:

Frame Navigation Commands

The First Falling lizard

As I’ve said elsewhere, almost every year I participate in Falling Lizard, the annual let’s-make-a-film-in-a-weekend party at the UCLA animation workshop.  The first year I participated was a year and a half before I actually started in the program.  My theory was that if I showed my face and enthusiasm enough then they’d have to accept me into the program.  I guess it worked, since I was accepted on my first try in 2003 🙂

The first Falling Lizard I attended had the theme “creation myths”. I put together a happy little film about what the first day might have been like. From concept to completion I created this piece in about 52 hours, completely analog and old-school. Presented here is a modest update, remastered in Flash and converted to widescreen. Enjoy!

Flash Panel Extension: Autosaver

Every time a new version of Flash is released I get excited and hopeful. On each new version, though, the excitement and hope is less and less. Adobe just never seems to address areas that I think need addressing.  Sometimes they even make things worse, such as in the transition from CS4 to CS5. CS5 and CS5.5 have this problem with a delay in updating the stage after executing a JSFL command.  It makes several of my commands much less useful, and I wasn’t ever able to figure out a workaround.  It impacts my workflow so much that I still don’t use Flash CS5 if I don’t have to.

One thing that they did do right, though, was adding auto-save to Flash CS5.5.  It boggled my mind why it was missing for so many years, particularly in a program that crashes as much as Flash does. Who can say what lurks in the minds of the Flash architects?  At least it arrived eventually and people can finally be secure that they aren’t going to lose their work if Flash crashes.

What, then, about the rest of us who haven’t upgraded?  Several years ago, long before CS5.5 existed, I got frustrated with the lack of autosave so I went out looking for a plugin that would do the job for me.  I found this auto-save WindowSWF panel, one that was a little too basic for me.  It had several fundamental problems that made it, in the end, not quite good enough. First, its layout is poor, making it take a lot of screen real-estate.  Second, it’s disabled by default, and it doesn’t remember its previous setting when Flash is started (meaning you have to remember to set it going every time you start Flash).  Third, it saves over the current file and you can’t roll back to a previous version unless you were careful to save off iterations manually.

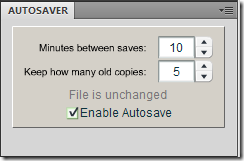
So I had finally had enough and I sat down to write a better one.  I ended up making one that works through the same basic system – a WindowSWF panel – but much more thought-out and featureful. Here’s what mine looks like:

image

There are three controls here.

  • Minutes between saves: controls how often the autosaver will save your file
  • Keep how many old copies: you can have it keep up to nine old versions of your file.  All the old files are stored in a subfolder of the folder your FLA is in, so your main directory doesn’t get cluttered with autosave files.
  • Enable: disables the autosaver if it’s unchecked.
  • Additionally, there’s a readout of how long it’ll be until the next auto-save, based on how long it’s been since the file was first modified.

One key thing to note is that this autosaver remembers its state, so it’ll come up exactly how you left it when you last had it open.  That means that it just works and you don’t have to think about it most of the time – a vital feature of a safety backup tool like this.

Since it’s a WindowSWF, though, you have to keep it open all the time.  If you collapse or dismiss the window it will stop running.  Unfortunately that just seems to be the way these things work, so it’s not totally foolproof.

David’s Autosaver installer

Flash JSFL Commands: Fun with Transforms

Usually, the tools that Flash provides natively are sufficient for dealing with transforms (the details of a symbol’s position, rotation, skew, and scale).  Sometimes, though, you need a little more.  I’m going to introduce two tools today that provide more flexibility in resetting symbols back to their default transform.

Reset Transform (improved)

When you hit ctrl-shift-Z in Flash it’ll reset the transform of all the selected symbols back to their default state.  That means 100% scale, with no rotation or skew.  But what if you want the default scale/rotation/skew to be something different?  Wouldn’t it be nice if you could define an arbitrary transform that you wanted ctrl-shift-Z to reset a symbol back to?

As you may have guessed, I’ve created just such a thing. It includes two Flash commands.

  1. The first creates a reference symbol that has your definitions of your symbols’ default state.  All you have to do is put all your symbols on the stage in the position you’d like them to be in by default and call Commands->Create symbol scale reference. That creates a symbol in your library called _symbol_scale_reference in which all your symbols you had selected now reside, defining their default transform.
  2. The is the command that does the resetting.  It simply takes the selected symbols and changes their transforms to match whatever is in _symbol_scale_reference.  If the reference symbol doesn’t exist then the command’s operation is identical to the standard Reset Transform command. I recommend switching your ctrl-shift-Z keyboard shortcut over to this command, since it’s functionally the same as the original Reset Transform but with the added functionality if you want it.

download_iconReset transform (improved) installer

Zero Transform

But that’s not all!  I have another even cooler extension for you today!

One of the functions that I sorely missed for years in Flash was Zero Transform.  That’s a function that takes the current state of a symbol instance and makes it the zero point in the transform.  That is, after zeroing a transform, your selected symbol won’t have changed in appearance but its transform will now be 100% scale with 0 rotation and skew. Any 3d animation program worth its salt has this functionality, so why doesn’t Flash?

It took some doing, but I managed to write a Zero Transform command for Flash.  I use it all the time, and I think you may find it useful too.

Included are two commands: Zero transform as is and Zero transform at scale. The first is exactly as I described above, and the one I find most useful.  The second does something very similar, except that instead of resetting the transform so that it ends up at 100% scale, it does it so that it ends up an arbitrary X and Y scales that you specify.

I use Zero transform as is enough that I have it bound to an easy-to-remember keyboard shortcut: ctrl-alt-Z. I think of it as a more authoritative version of ctrl-shift-Z.

download_iconZero Transform installer

I Must Destroy You

Students in their first year at the UCLA Animation Workshop create a short film. When I was there the only thing we were allowed to use a computer for was to master the sound. I followed that rule. Pretty much.

The rule was there because at some point in the 1990s, as computers became more more helpful in amateur filmmaking, some of the students in the workshop took advantage of those digital tools a little too much.  It got to the point where some of them were just phoning in their work, turning in films that were, at best, of questionable merit. So the professors of the workshop decided that it would be appropriate to require all first-years to work completely traditionally, with no help from a computer.  That would keep them from using the too-easy shortcuts that computers provided.

Not exactly the solution I would have arrived at, but that’s a debate for another time and place.  Really it’s a moot point now, since the rule has all but disappeared.  Thankfully, first-year students are now allowed to use computers, now simply held accountable for the quality of their films.

Anyway, this is all to preface the presentation of my first-year film.  This is it, animated the old-fashioned way, on cels with brushed lines and painted fills. I added digital energy sword effects after finishing it for school, but other than that it’s full-on old-school.  I hope you enjoy it.

I Can’t Do Anything Half-Assed

I’m only speaking slightly hyperbolically when I say that I can’t do anything half-assed. I always feel that if I’m going to do something that’ll be a lot of work, I might as well do it right. Take, for example, animation.

It can be frustrating to have that attitude sometimes. It means I do a lot less stuff.  It would be great to be able to just jump in and start animating something, but I think I’d end up with a bad result if I did that.  Why make it if it ends up being so bad that no one will want to watch it?

In the case of animation, story is vitally important.  That’s the real stopping point.  I have to sit down and make a good story to animate, otherwise it’s not worth creating the animation.

I’m thinking about this in relation to my Cats in Space series idea.  I made a very short animation based on that recently.  If you haven’t seen it yet, take a look:

I did that video in a super-rough style for the sake of getting it done fast.  I got an interesting comment on the Youtube page for that video, suggesting that if I did an episode like that once every two months and gave it some higher production value then I might actually be able to get some people following my Youtube channel.  That’s a pretty exciting thought to me.  I love the idea of people who I don’t know actually being interested in the stuff I make.

How hard would it be to do something like that?  Well, that’s where we get back to the basic premise of this post.  If I were to do a series then I’d want it to have a good overarching story.  Serialization, that is.  I should be able to string it together and have it be coherent as a whole presentation.  You know, because it should be something that new viewers can go back and watch sequentially and get the whole story.

To have a good story there has to be some planning.  You can’t just jump in because that’ll create a mess of a story.  You get more short-term gratification but in the long term you get a bit of a shoddy product.

For the last few days I’ve been messing around in Word, working on story ideas.  It’s hard.  There are good specific steps you can take to make a good story but you still have to have some creativity.  Maybe that’s obvious, but it’s something I need to remind myself of.  I need to come up with something good to make it engaging.

So yeah, that’s what I’m working on.  I’m excited to make it happen.  I guess we’ll see where it goes from here.